Tutorial: Maze Game#
In this chapter, we’ll build a maze game step by step.
The technique of creating a tilemap is common in many games. Once you’ve learned it here, you can apply it in your own projects.
Based on:
https://github.com/electronstudio/pygame-zero-bookLicense: Attribution-NonCommercial-ShareAlike 4.0 International
Step 1: Load Actors from a Tilemap#
A tilemap uses a small number of images (tiles) that are drawn multiple times to create a large game level (the map). This saves effort in creating graphics and makes level design easier to manage. In this example, we’ll create a maze level.
You need three image files: player.png and wall.png. Save them in the mu_code/images folder:
my_code
|
|--images
|----player.png
|----wall.png
Now let’s set up the framework for the game.
Create a World#
Use this basic structure for your game:
In line 2, a TiledWorld is created, which provides logic for tile-based worlds. You must call world.run() at the end to start the game.
from miniworlds import *
world = TiledWorld(8, 8)
world.tile_size = 64
world.add_background((0, 0, 0, 255))

# Your code here

world.run()
Create Actor Subclasses#
Create a subclass for each type of actor:
class Player(Actor):
    def on_setup(self):
        self.add_costume("player")
        self.layer = 1

class Wall(Actor):
    def on_setup(self):
        self.add_costume("wall")
self.add_costume adds a costume to the actor, based on an image (e.g. "player", "wall" – file extensions like .png or .jpeg can be omitted), or a color defined as an (r, g, b, a) tuple.
Create a Tilemap#
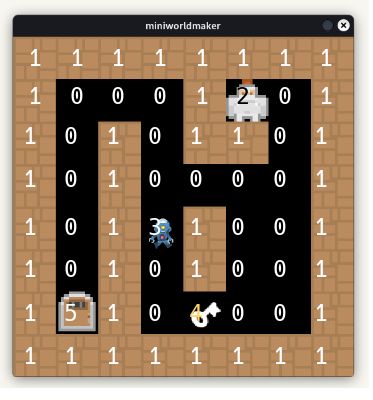
A tilemap is a 2D list that defines where each actor should be placed.
0: Empty
1: Wall
2: Player
tiles = [None, Wall, Player]

maze = [
    [1, 1, 1, 1, 1, 1, 1, 1],
    [1, 0, 0, 0, 1, 2, 0, 1],
    [1, 0, 1, 0, 1, 1, 0, 1],
    [1, 0, 1, 0, 0, 0, 0, 1],
    [1, 0, 1, 0, 1, 0, 0, 1],
    [1, 0, 1, 0, 1, 0, 0, 1],
    [1, 0, 1, 0, 0, 0, 0, 1],
    [1, 1, 1, 1, 1, 1, 1, 1]
]
Create Objects for Each Tile#
Create actors for each tile. The class to be instantiated is looked up from the tiles list:
@world.register
def on_setup(self):
    for row in range(len(maze)):
        for column in range(len(maze[row])):
            actor_cls = tiles[maze[row][column]]
            if actor_cls:
                actor_cls(column, row)
Step 2: Movement#
Move the Player#
Add this to the Player class to move the player:
class Player(Actor):
    def on_setup(self):
        self.add_costume("player")
        self.layer = 1

    def on_key_down(self, keys):
        if "UP" in keys:
            self.y -= 1
        elif "DOWN" in keys:
            self.y += 1
        elif "LEFT" in keys:
            self.x -= 1
        elif "RIGHT" in keys:
            self.x += 1
Block Movement#
Use the move_back() method to prevent movement into walls:
def on_key_down(self, keys):
    if "UP" in keys:
        self.y -= 1
    elif "DOWN" in keys:
        self.y += 1
    elif "LEFT" in keys:
        self.x -= 1
    elif "RIGHT" in keys:
        self.x += 1
    if self.detect_actor(Wall):
        self.move_back()
Create an Enemy#
Create an Enemy class that follows the player:
class Enemy(Actor):
    def on_setup(self):
        self.add_costume("enemy")
        self.velocity = 1
        self.layer = 1

    def act(self):
        self.y += self.velocity
        if self.detect_actor(Wall):
            self.move_back()
            self.velocity = -self.velocity
        if self.detect_actor(Player):
            print("You were caught!")
            exit()
Summary#
In this tutorial, you built a basic maze game with movable actors and a tilemap. With this foundation, you can add more features like scoring, levels, or smarter enemies!